Kendi macera oyununu yap
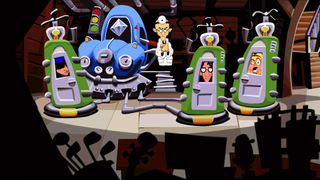
Sierra, King's Quest ve Space Quest gibi ilk PC maceralarını yaratmasaydı hayat nasıl olurdu? The Secret of Monkey Island, Day of the Tentacle veya Full Throttle gibi klasik Lucasarts oyunları olmasaydı nerede olurduk?
Kültürel olarak yoksun ve üzgün olurduk. Ve bu türe büyük isimlerin girmesi son yıllarda yavaşlamış olsa da, işaretle ve tıkla macera oyunları kesinlikle ölmedi. Monkey Island gazileri Ron Gilbert ve Gary Winnick tarafından yaratılan Thimbleweed Park, yakın zamanda büyük bir ses getirdi ve Tim Schaffer'ın Double Fine'ı, geliştiricinin klasik oyunlarının birçoğunu modern bir çağ için yeniden düzenlemek için çalışıyor.
You won’t be surprised to learn that there's also a big community out there creating their own – the majority of which make use of Adventure Game Studio, by far the easiest way to emulate the classic Sierra and Lucasarts games of yore.
And while there’s a raft of free AGS games out there, some even reach commercial success. Let’s get started, with the help of a few free assets from the instagame pack at Sylpher.com (opens in new tab) – though you’ll want to create your own graphics when you develop your own adventure game.
1. Download and install
Head on over to the Adventure Game Studio website (opens in new tab) and download the latest version of the software – at the time of writing, this is 3.4.0 Patch 4.
You’ll also need to get hold of the Visual C++ 2008 Service Pack 1 Redistributable (opens in new tab) which deals with a number of back-end requirements for Adventure Game Studio (AGS).
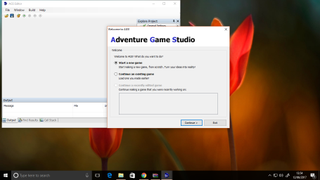
Install that first, then run the AGS installer. Leave everything selected when you’re given options, click ‘next’ through the rest of the installer, and click 'Install' when prompted. Click 'Finish' to launch the software for the first time, and click ‘Continue’ to start creating a new game.
2. Set up a project
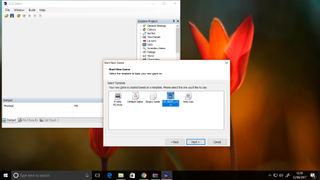
The new game wizard offers up a number of options which you’re free to experiment with.
For this tutorial we’ll stick with the simplistic Beneath a Steel Sky-style interface (LW_BASS_v2.0) which uses two buttons: left-click to interact, and right-click to examine.
This cuts down on the complexity – if you opt for a Lucasarts 9-verb template, you’ll have to do a lot of writing.
Enter a name for your game, a filename, and click 'Finish' to finalize the setup for your game.
Click 'Build > Run' to see the sample content that’s included and get a feel for what the interface can do.
3. Make a room
Rooms are where the action in your game takes place. Let’s add one: in the ‘Explore Project’ pane on the right hand side of the interface, expand ‘Rooms’, right click ‘1:’, and delete the pre-installed basic room.
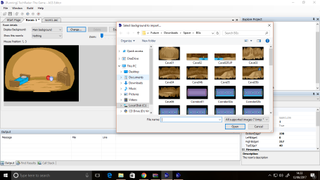
Then right-click ‘Rooms’ and insert a new room with the Blank Room template. Click the plus icon to expand your new room, then double click ‘Edit room’.
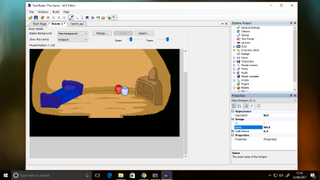
Click the 'Change' button, and find your room artwork; in our case, we’ve opted for one of the images from the Instagame pack – though we suggest you create your own and save it in PNG format before importing.
4. Room properties
Let’s tell Adventure Game Studio how to handle the room. Start by using the drop down box above to show the room’s edges, and drag these to match the limits of your room.
Use the same box to select ‘Walkable areas’, and use the tools in the toolbar above to mask off the areas which you’d like your character to be able to traverse. Click and drag with the right button to erase.
Now use the drop-down box to show the room’s hotspots. These are things that your player could potentially interact with, examine, or which otherwise deserve mentioning.
Paint them in as you did the walkable areas, selecting the different hotspots with the drop-down box above properties on the right. Be sure to rename each one with a Description and a name beginning with ‘h’ – our bed, for example, will have the design name hBed.
5. Event coding
So, we need to make a thing happen when we do a thing. The simplest way to demonstrate this is to have our character say something when we interact with a hotspot.
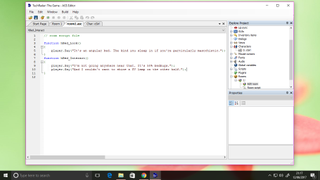
Click the lightning bolt icon above the hotspot properties to see the Events panel and, next to ‘Look at hotspot’, click the ellipsis button. You’ll be taken to a scary-looking but really not very scary coding panel, with the edges of a routine already put in place.
Hop back to the room tab and add an event for interacting with the hotspot in the same way.
Now, to actually get the main character to say something, enter a line in the following format between the curly braces representing each event:
player.Say(“I am saying something.”);Everything there is important, from the capitalisation to the brackets to the quotes to that infuriating semicolon at the end.
If you’d like your character to say multiple lines, just put another player.Say command in the next line. Make sure everything stays within the curly braces.
6. Test and tweak
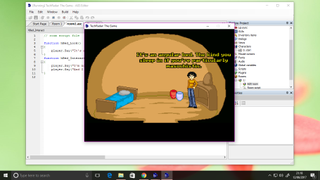
An important part of development is testing. At any time, you can see exactly how your adventure is shaping up by hitting the small play button on the upper toolbar to launch your game.
Try it now – there’s nothing quite like seeing a character start speaking words you’ve put into their mouths.
You’ll probably want to change a few things, though – we found, for example, that our character was walking over some of the objects in our sample room, so a tweak to the walkable area was in order.
If any of your code is wrong, you won’t even get this far: Adventure Game Studio will alert you as to what it’s found wrong, and you’ll need to poke around and fix it.
7. More rooms
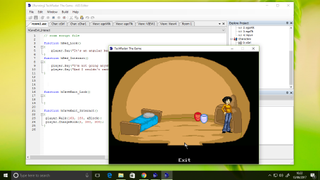
Our character really needs somewhere else to go. Set up another room, as we’ve done before, then head back to your original room and draw a new hotspot by the doorway, first selecting a new entry at the top of the properties window – if you don’t do this, anything you draw will simply be added to the hotspot you were working on originally.
Since we’re creating an exit, let’s note where it is: get the x,y coordinates for this by hovering your mouse over your room and noting the numbers just above it – this (usually) refers to the bottom of your character’s feet, so bear that in mind.
Add a bit of Interact script as we did before and, before writing any code, jump in to your second room and work out the coordinates at which you’d like your character to appear. Go back to the first room’s script, and add something like this between the door interaction’s curly braces:
player.Walk(168,193, eBlock);
player.ChangeRoom(2, 100, 50);
This will walk the player to specific coordinate, waiting – thanks to the eBlock argument – until the player has walked to that point to continue on with the script. It’ll then send the player sprite to room 2, at the appropriate coordinates and, since it’s our player character, the game will also switch room.
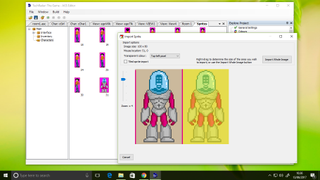
8. Arkadaş edinmek
Bir karakter daha ekleyelim. Karakter ağacına gitmemiz gerektiğini düşünebilirsiniz, ancak aslında bu süreç bir karakter ekleyerek başlar. Karakter ağacını genişletin, karakterler klasörüne girin, boş bir alana sağ tıklayın ve 'Dosyadan yeni hareketli grafiği içe aktar' seçeneğini seçin.
Model sayfanızı bulun – kendi sayfanızı oluşturuyorsanız, içe aktarma kolaylığı için her bir hareketli grafiğinizin eşit uzaklıkta yerleştirildiğinden emin olun – ardından sarı bir kutu oluşturmak için hareketli resimlerden birinin tüm alanı üzerinde sağ tıklayın ve sürükleyin.
Bunu ilk hareketli grafiğinizin üzerine yerleştirin, sol tıklayın ve içeri çekilecektir. Eylemi tekrarlayın ve maske doğru boyutta kalacaktır, böylece animasyonun bir sonraki karesine tıklamanız yeterlidir.
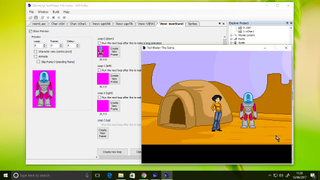
9. İyi görünmek
Şimdi bir görünüm eklemek için - yürüyen, konuşan veya diğer eylemleri gerçekleştiren karakteri temsil eden belirli hareketli karakterleri seçmek. 'Görünümler'i sağ tıklayın ve 'Yeni Görünüm'ü seçin.
'Yeni döngü oluştur'u tıklayın, pembe bir kutunun göründüğünü göreceksiniz; Bu ilk görünüm, "aşağı", oynatıcınız kameraya doğru yürürken kullanılan görüntüdür ve herhangi bir animasyonun ilk hareketli grafiği, karakter hareket etmediğinde kullanılacaktır.
Pembe kutuya çift tıklayın ve içe aktardığınız karakterlerden ilkini seçin. Yürüme animasyonları yapıyorsanız - biz değiliz, karakterimiz statik - artık aynı şekilde ek çerçeveler ekleyebilir ve hareketli karakterleri içe aktarabilirsiniz.
Her yeni döngü oluşturduğunuzda, farklı bir yönü kapsayacaktır. İşiniz bittiğinde, karakterinizin konuşması için başka bir görünüm ayarlayın – uygun şekilde adlandırın – ve konuşan karakterlerinizi uygun yönlere bakacak şekilde ekleyin.
Artık neredeyse orada: aslında bir karakter kurabiliriz. Keşfet bölmesinde 'Karakterler'i sağ tıklayın ve' Yeni Karakter'i seçin.
Özellikler penceresinde, normal görünümünü üzerinde çalıştığınız ilk animasyon ve konuşma görünümünü ikinci olarak ayarlayın.
Göz gezdirin ve diğer bazı değerleri ayarlayın – adı, başlangıç odası (bebeğimizi yeni odamıza koyuyoruz) ve yeni karakterinizin koordinatları – ve yeni ilavenizi çalışırken görmek için oyununuzu çalıştırın.
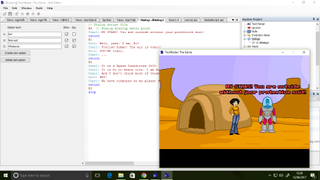
10. Sohbet edin
Yeni karakterinizle etkileşim kurmak şu anda çok fazla sonuç vermiyor, bu yüzden hızlı bir sohbet başlatalım.
Diyaloglar bölümüne gidin, sağ tıklayın ve 'Yeni İletişim Kutusu'nu seçin. Sorularınızı eklemek için soldaki düğmeleri kullanın ve her @-number girişi ile dönüş ifadesi arasında, başında 'c' olmadan ScriptNames karakterini kullanarak diyaloğunuza yazın. Bu örnekte, cGirl ve cMan arasındaki konuşmayı yazıyoruz:
@1
Girl: Hello!
Man: Nice to meet you.
return


@2
Girl: Goodbye!
Man: Cheers.
stop
Son girişteki dönüş ifadesini 'dur' ile değiştirmek, görüşmeden çıkar, böylece oyuncumuz keşfetmeye devam edebilir.
Konuşmayı bir karakter etkileşimine atamak için, sağ bölmede uygulanmasını istediğiniz karaktere çift tıklayın, ardından özellikler bölmesinde olaylar şimşek işaretine tıklayın.
Bu karakterle etkileşim kurmak için bir komut dosyası eklemek için üç nokta düğmesini kullanın, ardından kıvrık parantezler arasına aşağıdakine benzer bir satır girin:
dDialog1.Start();Doğal olarak ilk bölümü, iletişim kutunuzu dahili olarak adlandırdığınız adla değiştirin. Bir test yapın: artık yeni karakterinizle etkileşim kurabileceğinizi görmelisiniz.
Fark etmiş olacağınız gibi, bu öğretici ile yüzeysel olarak zar zor göz gezdirdik. Öğelere, bulmacalara veya herhangi bir anlamlı komut dizisine değinmedik.
Ama umarız yaptığımız şey, Adventure Game Studio'nun görünüşüne rağmen gerçekte ne kadar göz korkutucu ve basit olduğunu gösterir.
Onunla yapmak istediğiniz bir şey varsa - ve kararlıysanız aksiyon oyunları yaratacak kadar esnek bir motorsa - yazılımla birlikte gelen yardım dosyasına bakın veya çevrimiçi kılavuza bakın (yeni sekmede açılır ) .
İyi şanslar - ne yarattığınızı görmek için sabırsızlanıyoruz.
- Daha karmaşık bir oyun yapmak ister misiniz? Python kılavuzunda kendi macera oyununuzu nasıl kodlayacağınıza göz atın