İşletim sistemlerimiz, yazılımlarımız ve oyunlarımızda yükleme sürelerinde inanılmaz bir artış sağlayan SSD'lerin gıcırdayan mekanik sabit disklerimizin yerini alması daha yeni gibi geliyor. Ama aslında, SSD'nin en yeni ve en hızlı form faktörü - M.2 - zaten birkaç yıldır ortalıkta dolaşıyor ve şimdi oldukça uygun bir fiyata satın alınabiliyor.
Bu, işleri bir şekilde öncekilerden daha hızlı ve daha soğuk çalıştıran bu küçücük teknoloji plakalarının nasıl bağlanacağını ve kurulacağını öğrenmek için iyi bir zaman olduğu anlamına gelir. İyi haber şu ki, M.2 sürücülerin PC'nize takılması nispeten kolaydır - herhangi bir kablo veya yabancı malzeme gerektirmez.
Ancak PC'nizin iç kısımlarına herhangi bir donanım eklemek her zaman hassas bir iştir, bu nedenle bu kılavuz, yeni M.2 sürücünüzü doğru bir şekilde kurmanıza yardımcı olmak için burada.
- En iyi M.2 SSD 2020 (yeni sekmede açılır) : her yapılandırma ve bütçe için en hızlı SSD'yi elde edin
- Oyuncular neden SSD kullanmalı?
- Sizin için doğru harici SSD'yi nasıl satın alabilirsiniz?
1. Anakartınız M.2 anahtarınızla uyumlu mu?
Bir M.2 SSD satın alırken, ana kartınızın bununla uyumlu olup olmadığını bilmek önemlidir. M.2, SSD'nin çubuk benzeri form faktöründen başka bir şey değildir, ancak gerçekten önemli olan ayrıntı, farklı 'anahtarlar' kullanan daha yavaş SATA M.2 sürücülerin ve daha hızlı NVMe M.2 sürücülerinin olmasıdır.
Anakartınızda bir M.2 yuvası olsa bile, yeni M.2 sürücünüzle uyumluluğu, yuvanın B Key sürücüler, M+B Key veya M Key sürücülerle uyumlu olup olmadığına bağlı olacaktır.
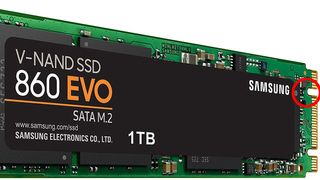
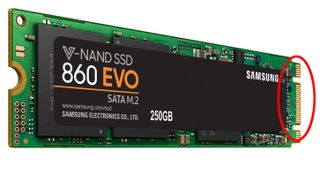
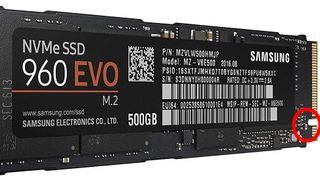
Bu nedenle, devam etmeden önce M.2 sürücünüzle uyumlu olup olmadığını anlamak için anakartınızı araştırmaya değer.
2. M.2 sürücüsünü PC'nize takın
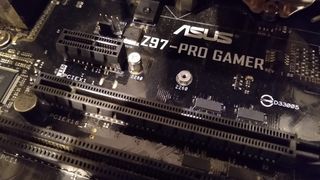
The location of the M.2 slot on your PC motherboard varies between different manufacturers and board models. The most common places to find an M.2 slot are between the GPU and CPU, or in the lower right part of your motherboard.
Some motherboards even have a special metal plate that covers the M.2 drive and keeps it cool, so you may need to unscrew that first.
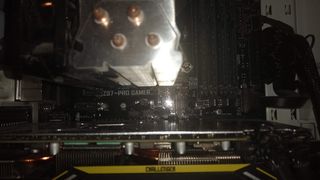
As you can see above, our M.2 slot is rather inconveniently sandwiched between a graphics card and processor. To comfortably insert the new M.2 drive, we’ll need to carefully remove my GPU and set it aside.
Once you’ve got all obstructing hardware out of the way, it’s time to insert your M.2 drive into the M.2 slot.
First, unscrew the mounting screw near the M.2 slot. If your M.2 drive came with any mounts, you should screw them in now. This will ensure that when you screw down the drive it will be parallel to the motherboard rather than angled down towards it.
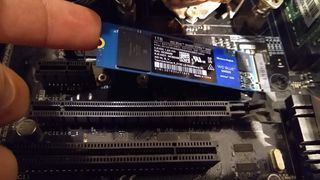
With the mounting screw out and the drive mounts in (if provided), carefully insert your M.2 drive into the M.2 slot at a 30-degree angle from the motherboard.
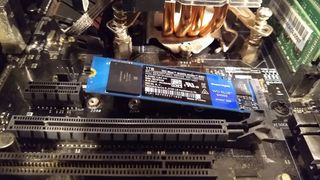
Once inserted, it should dangle at that 30-degree angle up from the motherboard.
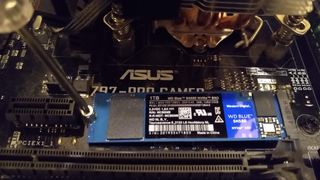
Gently press the upward-angled end of the drive down towards the screw mount, then secure it with the mounting screw. Don’t overscrew it, but screw it in enough so that the M.2 drive isn’t wobbling.
Reinsert your GPU and any other hardware you had to remove previously, close your PC case, and plug everything back in.
3. Install your M.2 Drive in BIOS
Before you install your M.2 drive on Windows 10, there may be a few things you need to configure in your motherboard BIOS. The tweaks you should make will depend on your motherboard’s capabilities, but one in particular may be essential if you want Windows to recognise your M.2 drive.
Go to your BIOS (usually by pressing F2 or Delete when your PC is booting).
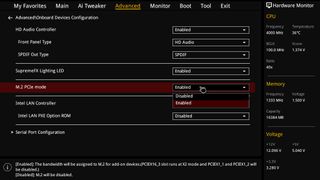
The exact process from here will vary depending on your motherboard. On our ASUS Z97 Pro Gamer board, we went to Advanced > Onboard Devices Configuration > M.2 PCIe mode and changed the dropdown to ‘Enabled’. On other Asus boards, you go to Advanced, click the dropdown next to ‘PCI Express X4_3 Slot Bandwidth’ and change it to M.2 Mode.
Save and exit.
4. Install your M.2 Drive in Windows 10
Your M.2 drive should now be recognised by Windows 10. Log into Windows 10, type ‘disk management’ into the Start search bar, and choose the option to create hard disk partitions.
Here, your new M.2 drive should appear in the lower half of the window with ‘Unallocated’ space.
What you do from here depends on whether you want to run Windows 10 from your new NVMe or whether you just want to use it as a regular drive. We have a guide on hand if you want to move Windows 10 over to your new M.2 drive.
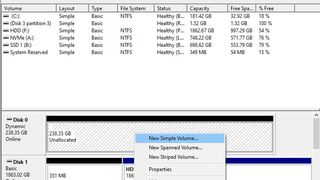
M.2 sürücünüzü normal bir sürücü olarak kullanmak istiyorsanız, yanında 'Ayrılmamış' yazan çubuğa sağ tıklayın > Yeni Basit Birim, ardından sürücünüzü oluşturmak için talimatları izleyin. Sihirbaz sırasında dikkat edilmesi gereken önemli bir nokta, 'Dosya sistemi'ni NTFS olarak ayarlamaktır. Bunun ötesinde, sürücüye bir ad verin ve diğer seçeneklerin çoğu oldukları gibi iyi olmalıdır.
Bu bittiğinde, hızlı yeni NVMe'niz kullanıma hazırdır! Daha önce neredeyse kesinlikle yaşamadığınız düzeyde okuma/yazma oranlarının keyfini çıkarın.