Salesforce (yeni sekmede açılır), son derece özelleştirilebilir, çok yönlü bir toplam iş yazılım paketi sağlar. Kullanıcılar, satış, hizmet, pazarlama ve diğer ticari işlevler için çeşitli ürünlere erişebilir. Tableau (yeni sekmede açılır), Salesforce'un sahip olduğu ve tüm yazılım ürünleriyle uyumlu olacak şekilde tasarlanmış bir iş analitiği yazılımı markasıdır. Bu programları birlikte kullanmak mümkündür, ancak bunu yapmak için öncelikle Tableau ile Salesforce'u nasıl kuracağınızı anlamanız gerekir.
Bu iki güçlü sistemi birbirine bağlamak için bu sekiz basit adımı izleyin ve Tableau'nun anlayışlı iş analitiği tarafından desteklenen, piyasadaki en iyi CRM yazılımı (yeni sekmede açılır) çözümlerinden biri olan Salesforce'un tüm gücünden yararlanın .
Bugünün en iyi Salesforce fırsatları
")
How to set up Salesforce with Tableau: Preparation
Once Salesforce acquired Tableau in August 2019, Tableau became a native application in the Salesforce suite. As such, it comes with a built-in Salesforce connector that enables you to connect Tableau analytics to your Salesforce data quickly and easily. To take advantage of this functionality, you must first create a Salesforce account and install Tableau (opens in new tab) on the host workstation.
Before you install Tableau, make sure that your machine matches all of the system requirements detailed in the before you install (opens in new tab) guide on Tableau’s website. If your machine is up to the task, install Tableau by following the step-by-step installation instructions (opens in new tab). Once Tableau is installed, it is time to create a Salesforce account.
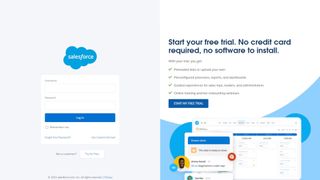
Salesforce is a total business software solution with over 14 different products under its umbrella. To create an account, you will need to sign up for at least one of these products, such as Service Cloud (opens in new tab), Sales Cloud (opens in new tab), or Marketing Cloud (opens in new tab). If you would like to learn more about Service Cloud, read our Service Cloud Review.
Once you have selected your Salesforce products, you will be asked to set up an account with a username and password. Hold on to these, as you will need them to link Salesforce to your Tableau account.
Step 1: Ensure that the correct APIs are enabled
APIs (opens in new tab) are programs that enable applications to access data in your Salesforce org (opens in new tab). Going into detail about what an org is falls outside the scope of this guide, but consider it to be your ID in Salesforce—all of your Salesforce products and applications are linked to your “org number.” If you want to connect Tableau to Salesforce, you will need to make sure that your company’s org has the following APIs enabled:
- SOAP API to sign in
- BULK API to download objects
- REST API to get metadata and download objects not supported by BULK API
- Replication SOAP APIs to retrieve changes in your data
If you are uncertain, liaise with your IT team or contact Salesforce support for assistance to ensure that the correct APIs are enabled.
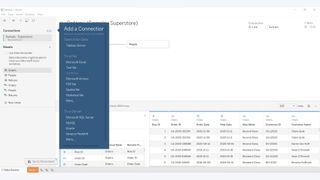
Step 2: Launch Tableau’s connector
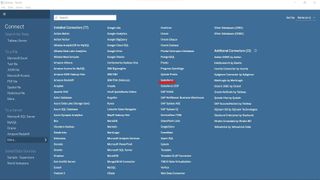
Once you have enabled the correct APIs, launch Tableau. Navigate to More, under To a Server in the connect panel on the left. Then select Salesforce from the list that opens up. This will open a new browser window with a dialog box prompting you to enter your Salesforce username and password. Enter them to proceed.
The dialog box will now prompt you to allow Tableau to have access to your Salesforce account. Click “allow” to give Tableau the required access.
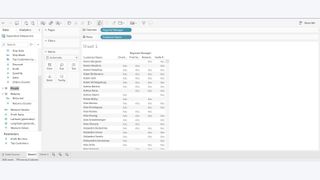
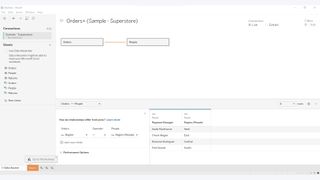
Step 3: Name your data source
At this point, assuming all the APIs from step one have connected correctly, you should reach the data source page. If you get an error that mentions hitting the API limit, jump ahead to Step 7. If any other error occurs at this stage, contact Salesforce support—the issue is likely related to one or more of the APIs.
Assuming everything has worked, your database should now be transferred from Salesforce to Tableau. You can rename your data source name at the top of the screen. It is best practice to do so according to your company’s naming convention—this way other users can easily recognize where this data came from.
It is worth noting that some data cannot be transferred successfully from Salesforce. Text fields with more than 4096 characters, and calculated fields—fields that pull data from other fields with a formula—will not transfer into Tableau.
Step 4: Select a schema
The next step is to create the actual connection between the Salesforce data you just downloaded and Tableau’s analytics. To do so, choose either a standard or custom connection.
A standard connection uses predefined queries with a drag-and-drop interface to analyze your data. A custom connection enables you to write your own queries. Custom queries give you more options as a user, but require a working knowledge of VizQL, Tableau’s query language.
For a standard connection, drag one of the commonly used predefined queries from the left side of the screen onto the main work area, and begin your analysis. If you want to use a custom connection, go to the table tab and select a table with any custom objects created by your organization—your team will need to build them in Tableau beforehand.
If you do not need to set up any connections between tables, or to connect your data to other databases, you can start using Tableau to run your analysis. Feel free to skip to Step 8 of this guide.
Step 5 (optional): Set up joins
Before you can run Tableau’s analytics on your Salesforce data, you may need to create joins in your data. Different tables might need to be joined together to run your analysis—values that show up in different tables can be linked, and strings can be concatenated.
When you right-click a table in the Tableau workspace, a list of available tables to join appears. Simply click on the fields you want to join and drag a line between them to link them together. You can join any string fields, as well as any fields where the same value appears on two or more tables at once, called constrained fields. To learn more about joins, read the Tableau team’s tutorial here (opens in new tab).
Once you have joined the data to your liking, you can run your Tableau analysis. If you do not need to join databases together, feel free to skip ahead to Step 8 of this guide. Otherwise, read on to learn how to link your Salesforce data to information from other databases.
Step 6 (optional): Link your Salesforce data to other databases in Tableau
Connecting Salesforce data in Tableau to data from other sources to run a combined analysis requires a cross-database join. For instance, marketing data from Google Analytics (opens in new tab) can be combined with data from Salesforce Marketing Cloud to run a combined analysis with Tableau.
Adding a join from another database is not complicated—simply select the + icon next to connections on the top left of the join menu and choose what data source you want to link to. Select that data source and choose the table you wish to join.
There are some types of data sources that cannot be connected to Salesforce data. Namely, any data that is updated live cannot be connected to Salesforce, because Tableau does not allow that functionality for live updates on Salesforce data.
Step 7 (optional): Contact Tableau support to get a workaround for API limit errors.
Recall the APIs you enabled in Step 1 of this guide. These APIs essentially enable Tableau to enter your Salesforce database and collect data. Your Salesforce database sits on the cloud, sharing space with the data of other Salesforce users. Every time Tableau pulls information from Salesforce it increases the load on its servers. To get around this problem, Salesforce actively limits how many API requests—requests by other applications, like Tableau, to access data—can happen at one time.
Yukarıdaki tüm adımları izledikten sonra bir API sınırı hatası alırsanız bu, Tableau kurulumunuzun API istekleri sınırına ulaştığı ve Salesforce'un Tableau'nun daha fazlasını yapmasını engellediği anlamına gelir. Bu hatayı çözmek için Tableau teknik destek ekibiyle iletişime geçin (yeni sekmede açılır) : kullanım durumunuza özel bir geçici çözüm geliştireceklerdir.
8. Adım: Verileri periyodik olarak güncelleyin
Tableau'yu Salesforce sisteminize ilk bağladığınızda, müşteri verilerinizin statik bir anlık görüntüsünü yükleyecektir. Bu, siz yüklemenizin ardından Salesforce'a müşteriler eklenirse veya Salesforce'tan kaldırılırsa bu bilgilerin Tableau'da otomatik olarak güncellenmeyeceği anlamına gelir.
Verilerinizi güncellemek için tam yenileme veya artımlı yenileme yapabilirsiniz. Kademeli yenileme, son yenilemeden bu yana değişen veya Salesforce'a eklenen tüm nesneleri yeniden yükleyecektir. Bu geçmişin yalnızca 30 gün geriye gittiğini unutmayın.
Artımlı yenilemeyi 30 günden fazla tamamlamayı ihmal ettiyseniz, tüm verileri sıfırdan yeniden yükleyerek tam bir yenileme yapmanız gerekecektir. Bu daha uzun sürecektir ancak Tableau raporlamanızda hiçbir bilginin gözden kaçmamasını sağlayacaktır.
Özet

Artık Salesforce paketinizi Tableau'ya nasıl bağlayacağınızı bildiğinize göre, sunduğu gelişmiş iş analitiği işlevlerinden tam olarak yararlanabilirsiniz. Bu, kolay bir sürükle ve bırak arabirimiyle gelişmiş raporlar oluşturmayı, veri yönetişim işlevlerine erişmeyi ve işletmeniz büyüdükçe analitiği zahmetsizce ölçeklendirmeyi içerir.
daha fazla okuma
CRM hakkında daha fazla bilgi edinmek için küçük işletmeler için en iyi CRM'ler kılavuzumuzu veya küçük işletmeler için kılavuzumuzu okuyun: Küçük işletme CRM'sine ihtiyaç duymanızın beş nedeni .
Veya güçlü bir iş iletişimi platformuyla Salesforce paketinizi nasıl daha da genişleteceğinizi öğrenmek için Slack'i Salesforce entegrasyonuna nasıl kuracağınıza ilişkin kılavuzumuzu okuyun .